
 As with other wood materials, these sidings have to be re-stained from time to time. Basically, re-staining this log siding will help you preserve the aesthetic appeal of your home. In addition, it helps extend the life expectancy of your sidings. With proper maintenance, these sidings may last for sixty years or even more.Re-staining these sidings is fairly easy, and can be done with just a few materials and tools.
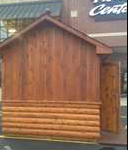
Here is a step-by-step guide on how to stain a log cabin siding:
Cleaning
Clean the wood’s surface thoroughly using a wood treatment cleaner or bleach. When cleaning the wood, make sure to apply the instructions stated on the bleach or wood cleaner. Also, apply the cleaner to the wood surface by spraying it. After that, gently clean the wood using a sponge.
Besides cleaning your wood, applying a bleach of wood cleaner will make the wood more porous as well. What’s more, it can enable the logs to better absorb the stain.
Rinsing
Rinse the logs using a pressure washer. When washing, set the washer’s pressure below 500 psi, as anything beyond that can damage the sidings. Aside from cleaning and removing the cleaner, rinsing the siding with a pressure washer also removes the old and faded stains. That said, rinsing can give your siding a clean surface for you to stain.
Mix the stain
Mix your stain thoroughly. If you have already mixed it prior to cleaning the wood surface, mix it again, as its color pigment tends to remain at the container’s bottom.
First coating
Apply the first stain coating to the surface using a wide-edge paintbrush. In this case, it is wise that you start coating at the top and continue working downwards. Also, only work on a couple of logs at a time to avoid having overlapped lines.
Allow it to dry
Allow the coated stain to dry for at least a couple of days.
Caulk holes and gaps
When staining older cabins or homes, take time to examine your doors, windows and other areas that may have holes and gaps. If there are any gaps and holes on your interior, fill them up. Using a regular putty knife, remove the cracked and dried caulking and replace it with a new one. In this case, use superior quality and high-grade latex caulk. After installing the new caulk, allow it to dry and harden for twenty four hours or more.
Finishing touches
Apply the second coating of stain to your log cabin siding. By doing this, not only are you adding the finishing touches to your log, but you are also making sure that the stain will last for a while.


